Tkinter
Table of contents
- Creating a basic window
- Displaying text
- Buttons
- Input
- Grid
- Frames
- Messagebox
- Toplevel
- Other widgets
- Menu
- CustomTkinter - aesthetic Tkinter
The tkinter module is used to create simple GUI applications.
Creating a basic window
import tkinter as tk
root = tk.Tk() # creating a window
root.title("Window") # setting the window's title
root.geometry("300x200+100+200") # setting the window's size (width x height), and where it will appear (x, y)
root.resizable(False, False) # setting whether the window's width (first value) and height (second value) are resizable
root.configure(bg="lightblue") # setting the window's background color
# root.iconbitmap("app_icon.ico") # setting the window's icon

def on_close():
    print("The window has closed.")
    root.destroy() # closing the window
root.protocol("WM_DELETE_WINDOW", on_close) # overriding the default behavior of the close button

# root.after(3000, root.destroy) # closing the window after 3 seconds
root.mainloop() # running the window
Displaying text
import tkinter as tk
root = tk.Tk()
root.geometry("300x200")
tk.Label(root, text="CPUcademy").pack() # creating a label with the text "CPUcademy" and loading it into the window named root

text = tk.Label(root, text="Python", width=10, height=4) # (width of 10 characters, height of 4 lines)
text.pack()

tk.Label(root, text="Java").pack(side=tk.LEFT) # setting the position of the label (could be also: tk.RIGHT, tk.TOP, tk.BOTTOM)

myLabel = tk.Label(root, text="Tkinter", bg="red", fg="white", font=("Arial", 20)) # (background color red, font color white, font Arial with size 20)
myLabel.place(x=100, y=100) # placing the label at an absolute position

myLabel = tk.Label(root, text="Tkinter 2", anchor="e", width=10, bg="blue") # anchor to the right (east) side of the Label's space
myLabel.place(relx=0.5, rely=0.5) # placing a widget at a position relative to the window

root.mainloop()
Arguments like width, fg, etc., can also be used with other widgets.
Buttons
import tkinter as tk
root = tk.Tk()

def buttonClicked():
    print("CPUcademy")

myButton = tk.Button(root, text="Button", command=buttonClicked) # we write the function name without parentheses because we want to get a callable function object and not call it right away (lambda: buttonClicked() would also work)
myButton.pack()

# Changing the status of a button (also works with other widgets)
tk.Button(root, text="Button 2", command=buttonClicked, state="active").pack() # the button is fully functional (the default state)
tk.Button(root, text="Button 2", command=buttonClicked, state="normal").pack() # the button is still functional, but the visual appearance is altered
tk.Button(root, text="Button 2", command=buttonClicked, state="disabled").pack() # the button is disabled

root.mainloop()
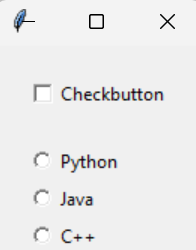
Checkboxes and radiobuttons (handling functions with arguments)
import tkinter as tk
root = tk.Tk()

def buttonClicked(text):
    l = [0, 1]
    if text in l:
        global ifSelected
        text = l[1] if text == l[0] else l[0]
        ifSelected = text
    print(text)

ifSelected = 0
myCheckbutton = tk.Checkbutton(root, text="Checkbutton", command=lambda: buttonClicked(ifSelected))
myCheckbutton.pack(padx=20, pady=20) # padx - padding on the x-axis, pady - padding on the y-axis (from both sides)

v = tk.IntVar() # a variable to store the value of the selected radiobutton
myRadiobutton1 = tk.Radiobutton(root, text="Python", variable=v, value=1, command=lambda: buttonClicked("Python"))
myRadiobutton1.pack(anchor="w", padx=20)
myRadiobutton2 = tk.Radiobutton(root, text="Java", variable=v, value=2, command=lambda: buttonClicked("Java"))
myRadiobutton2.pack(anchor="w", padx=20)
myRadiobutton3 = tk.Radiobutton(root, text="C++", variable=v, value=3, command=lambda: buttonClicked("C++"))
myRadiobutton3.pack(anchor="w", padx=20)

root.mainloop()
Input
import tkinter as tk
root = tk.Tk()

def myGet():
    x = str(myEntry.get())
    print(x)

defaultText = tk.StringVar()
defaultText.set("Write something...") # setting the default text in the Entry widget

myEntry = tk.Entry(root, textvariable=defaultText)
myEntry.pack()
tk.Button(root, text="Confirm", command=myGet).pack()

myPasswordEntry = tk.Entry(root, show="*") # hiding the text in the Entry widget (password protection)
myPasswordEntry.pack()

root.mainloop()
The example below creates a placeholder (a text that will disappear when the user enters the widget) for the input field.
import tkinter as tk
root = tk.Tk()

def on_focus_in(event):
    if defaultText.get() == "Write something...":
        defaultText.set("")

def on_focus_out(event):
    if defaultText.get() == "":
        defaultText.set("Write something...")

def myGet():
    x = str(myEntry.get())
    print(x)

defaultText = tk.StringVar()
defaultText.set("Write something...")

myEntry = tk.Entry(root, textvariable=defaultText)
myEntry.pack()
tk.Button(root, text="Confirm", command=myGet).pack()
myEntry.bind("<FocusIn>", on_focus_in)
myEntry.bind("<FocusOut>", on_focus_out)

root.mainloop()
Grid
We can create a grid inside the window to easily place widgets in it.
import tkinter as tk
root = tk.Tk()

myLabel1 = tk.Label(root, text="First:")
myLabel2 = tk.Label(root, text="Second:")

myLabel1.grid(row=0, column=0, pady=2)
myLabel2.grid(row=1, column=0, pady=2)

myEntry1 = tk.Entry(root)
myEntry2 = tk.Entry(root)

myEntry1.grid(row=0, column=1, pady=2)
myEntry2.grid(row=1, column=1, pady=2)

root.mainloop()
Frames
A frame is a container in which we can place various widgets and then change the position of the entire frame relative to the window.
import tkinter as tk
root = tk.Tk()

myFrame = tk.Frame(root)
myFrame.pack()

tk.Label(myFrame, text="First:").pack()
myEntry = tk.Entry(myFrame)
myEntry.pack()

tk.Label(myFrame, text="Second:").pack()
myEntry2 = tk.Entry(myFrame)
myEntry2.pack()

root.mainloop()
Messagebox
A messagebox is a window with a notification like: "Do you want to continue?".
from tkinter import messagebox

messagebox.showinfo("show info", "Information")
messagebox.showwarning("show warning", "Warning")
messagebox.showerror("show error", "Error")
messagebox.askquestion("ask question", "Are you sure?")
messagebox.askokcancel("ask ok cancel", "Do you want to continue?")
messagebox.askyesno("ask yes no", "Find the value?")
messagebox.askretrycancel("ask retry cancel", "Try again?")

# Accessing the selected value
x = messagebox.askretrycancel("ask retry cancel", "Try again?")
if x:
    print("Yes")
else:
    print("No")
Toplevel
In Tkinter, a top-level window is a separate window that is not the main application window. The main window typically uses Tk(), while additional windows are created using Toplevel(). It features the same attributes as Tk() (title, geometry, etc.)
import tkinter as tk
root = tk.Tk()

def open_window():
    top = tk.Toplevel(root)
    tk.Label(top, text="This is a top-level window.").pack()

tk.Button(root, text="Open a new window", command=open_window).pack()

root.mainloop()
Other widgets
Text
import tkinter as tk
root = tk.Tk()

def myGet():
    values = []
    text = str(myText.get(1.0, tk.END))
    latestEnter = 0
    for x, y in enumerate(text):
        if y == "\n":
            toAppend = text[latestEnter:x]
            if "\n" in toAppend:
                toAppend = toAppend.replace("\n", "")
            else:
                toAppend = text[:x]
            values.append(toAppend)
            latestEnter = x
    print(values)

myText = tk.Text(root, height=5, width=20, wrap=tk.WORD)
myText.pack()
tk.Button(root, text="Show value", command=myGet).pack()

root.mainloop()
Images
import tkinter as tk

root = tk.Tk()
img = tk.PhotoImage(file="img.png")
tk.Label(root, image=img).pack() # this would also work for a button

root.mainloop()
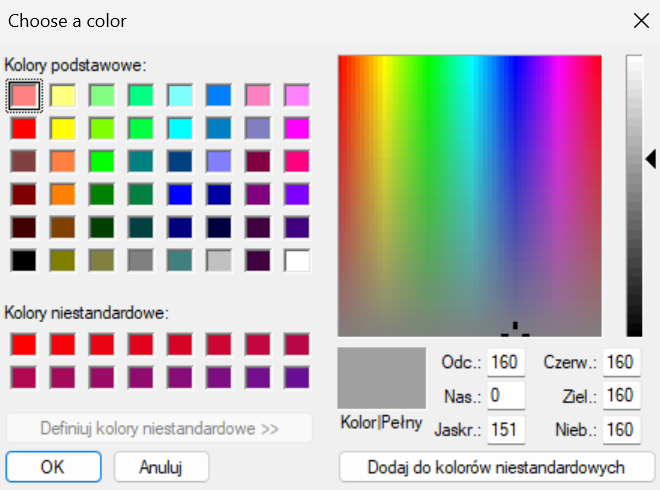
Colorchooser
import tkinter as tk
from tkinter import colorchooser

def choose_color():
    color_code = colorchooser.askcolor(title="Choose a color")[1]
    if color_code:
        root.config(bg=color_code)

root = tk.Tk()

color_button = tk.Button(root, text="Choose a color", command=choose_color)
color_button.pack(pady=20)

root.mainloop()
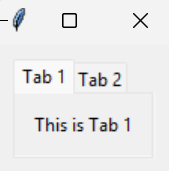
Tabs
import tkinter as tk
from tkinter import ttk
root = tk.Tk()

notebook = ttk.Notebook(root)
notebook.pack(pady=10, expand=True)

tab1 = ttk.Frame(notebook)
tab2 = ttk.Frame(notebook)

notebook.add(tab1, text="Tab 1")
notebook.add(tab2, text="Tab 2")

tk.Label(tab1, text="This is Tab 1").pack(padx=10, pady=10)
tk.Label(tab2, text="This is Tab 2").pack(padx=10, pady=10)

root.mainloop()
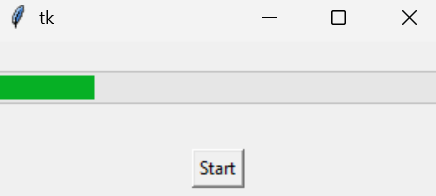
Progressbar
import tkinter as tk
from tkinter import ttk
import time
root = tk.Tk()

def start_progress():
    for i in range(101):
        progress_bar["value"] = i # setting the progress bar's value
        root.update_idletasks() # updating the GUI
        time.sleep(0.05) # simulating work

progress_bar = ttk.Progressbar(root, length=300, mode="determinate", maximum=100) # try also: mode="indeterminate"
progress_bar.pack(pady=20)
tk.Button(root, text="Start", command=start_progress).pack(pady=10)

root.mainloop()
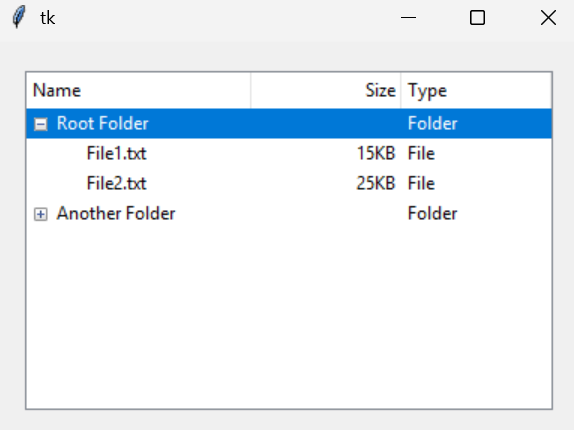
Treeview
import tkinter as tk
from tkinter import ttk
root = tk.Tk()

def on_select(event):
    selected_item = treeview.selection()[0] # getting the selected item
    print(f"Selected item: {treeview.item(selected_item)['text']}")

treeview = ttk.Treeview(root)
treeview.pack(padx=20, pady=20)

# Defining the columns (treeview has an implicit column 0)
treeview["columns"] = ("Size", "Type")

# Configuring the columns
treeview.column("#0", width=150, minwidth=150, anchor="w")
treeview.column("Size", width=100, minwidth=100, anchor="e")
treeview.column("Type", width=100, minwidth=100, anchor="w")

# Defining the headings (titles for the columns)
treeview.heading("#0", text="Name", anchor="w")
treeview.heading("Size", text="Size", anchor="e")
treeview.heading("Type", text="Type", anchor="w")

# Adding data (parent nodes and child nodes)
root_node = treeview.insert("", "end", text="Root Folder", values=("", "Folder"))
treeview.insert(root_node, "end", text="File1.txt", values=("15KB", "File"))
treeview.insert(root_node, "end", text="File2.txt", values=("25KB", "File"))

folder_node = treeview.insert("", "end", text="Another Folder", values=("", "Folder"))
treeview.insert(folder_node, "end", text="File3.txt", values=("30KB", "File"))

treeview.bind("<<TreeviewSelect>>", on_select)
root.mainloop()
Spinbox
import tkinter as tk
root = tk.Tk()

def show_value():
    print(f"Selected value: {spinbox.get()}")

spinbox = tk.Spinbox(root, from_=0, to=10)
spinbox.pack(pady=20)
tk.Button(root, text="Show value", command=show_value).pack(pady=10)

root.mainloop()
Scrollbar and listbox
import tkinter as tk
root = tk.Tk()

def get_selected_item():
    selected_index = myListbox.curselection()
    if selected_index:
        return myListbox.get(selected_index)
    else:
        return None

myScrollbar = tk.Scrollbar(root)
myScrollbar.pack(side=tk.RIGHT, fill=tk.Y)

myListbox = tk.Listbox(root, yscrollcommand=myScrollbar.set) # creating a listbox widget with a scrollbar

items = ["a", "b", "c", "d", "e", "f", "g", "h", "i", "j", "k", "l", "m", "n", "o", "p", "r", "s", "t", "u", "w", "y", "z"]
for item in items:
    myListbox.insert(tk.END, item)

myListbox.pack(side=tk.LEFT, fill=tk.BOTH, expand=True)
myScrollbar.config(command=myListbox.yview)

tk.Button(root, text="Show value", command=lambda: print(get_selected_item())).pack()

root.mainloop()
Scale
import tkinter as tk
root = tk.Tk()

def show_value(value):
    print(f"Selected value: {value}")

scale = tk.Scale(root, from_=0, to=100, orient=tk.HORIZONTAL, command=show_value)
scale.pack(pady=20)

root.mainloop()
Filedialog
import tkinter as tk
from tkinter import filedialog
root = tk.Tk()

def open_file():
    # Opening a file dialog and getting the selected file's path
    file_path = filedialog.askopenfilename(title="Open a File", filetypes=(("Text Files", "*.txt"), ("All Files", "*.*")))
    if file_path:
        with open(file_path, "r") as file:
            content = file.read()
            text_widget.delete(1.0, tk.END) # clearing the existing content of the Text widget
            text_widget.insert(tk.END, content) # inserting new content into the Text widget

def save_file():
    # Opening a save file dialog and getting the selected file's path
    file_path = filedialog.asksaveasfilename(title="Save a File", defaultextension=".txt", filetypes=(("Text Files", "*.txt"), ("All Files", "*.*")))
    if file_path:
        content = text_widget.get(1.0, tk.END) # getting the content from the Text widget
        with open(file_path, "w") as file:
            file.write(content) # saving the content of the Text widget to a file

text_widget = tk.Text(root, wrap=tk.WORD, width=50, height=15)
text_widget.pack(pady=10)

tk.Button(root, text="Open File", command=open_file).pack(pady=5)
tk.Button(root, text="Save File", command=save_file).pack(pady=5)
root.mainloop()
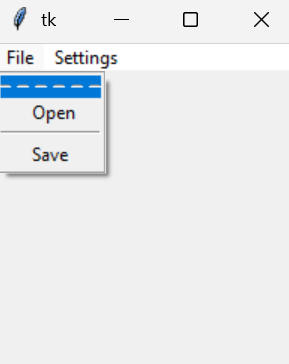
Menu
import tkinter as tk
root = tk.Tk()

def buttonClicked():
    print("CPUcademy")

menu = tk.Menu(root, tearoff=0)
root.config(menu=menu)
filemenu = tk.Menu(menu)

menu.add_cascade(label="File", menu=filemenu)
filemenu.add_command(label="Open", command=buttonClicked)
filemenu.add_separator()
filemenu.add_command(label="Save", command=buttonClicked)

menu.add_cascade(label="Settings", command=buttonClicked)

root.mainloop()
Right-click context menu
import tkinter as tk
root = tk.Tk()

def buttonClicked():
    print("CPUcademy")

def show_menu(event):
    menu.post(event.x_root, event.y_root) # displaying the menu on right-click

menu = tk.Menu(root, tearoff=0)

filemenu = tk.Menu(menu, tearoff=0)
filemenu.add_command(label="Open", command=buttonClicked)
filemenu.add_separator()
filemenu.add_command(label="Save", command=buttonClicked)
menu.add_cascade(label="File", menu=filemenu)

menu.add_command(label="Settings", command=buttonClicked)

root.bind("<Button-3>", show_menu)
root.mainloop()
CustomTkinter - aesthetic Tkinter
CustomTkinter is a module based on Tkinter that provides pre-styled widgets to make your application look more modern and appealing. It works the same way as Tkinter but with a sleeker design. Once you have installed (pip install customtkinter) and imported CustomTkinter, the only change you need to make to your existing Tkinter code is to add the CTk prefix to the widgets you used (e.g., CTkLabel, CTkButton, etc.). You can find the GitHub repository of this module here.
import customtkinter as ctk
root = ctk.CTk()
ctk.CTkLabel(root, text="Hello World!").pack()
root.mainloop()